
I love making this no commercial yeast starter because it’s simple and brings a natural, homemade touch to baking. It’s exciting to watch the mixture bubble and grow each day, knowing it will help create delicious bread without any store-bought yeast. Scroll down to see how easy it is to get started with just two ingredients!
This recipe uses whole wheat flour and filtered water, which you might already have at home. If you don’t have whole wheat flour, you can find it in most supermarkets in the baking aisle. Filtered water is just water that’s been cleaned to remove impurities, so if you don’t have a filter, tap water that’s been left out for a few hours works fine too.
Ingredients For No Commercial Yeast Starter Recipe
Whole wheat flour: This is flour made from the entire wheat kernel, giving your starter a rich flavor and plenty of natural yeast to help it grow.
Filtered water: Water that has been purified to remove chlorine and other chemicals, which helps the natural yeast develop better in your starter.
Technique Tip for This Recipe
One of the most important steps in making your starter is the daily feeding and discarding process. It might sound a little strange at first, but it really helps your starter grow strong and bubbly. Here’s how to do it without any trouble:
- Each day, take your jar and stir the starter gently to mix everything together.
- Then, use a spoon or a small cup to remove about half of the starter from the jar. You can throw this part away or use it in other recipes like pancakes.
- After you’ve discarded half, add ½ cup of whole wheat flour and ½ cup of filtered water to the jar.
- Stir everything well until it’s smooth and combined.
- Cover the jar again with a cloth so it can breathe but keep out dust or bugs.
Doing this every day might seem like extra work, but it’s what keeps the natural yeast and good bacteria happy and active. If you don’t discard some of the starter, it can get too big and crowded, which makes it harder for the yeast to grow. Feeding it fresh flour and water gives the yeast new food to eat, so it gets bubbly and smells tangy—just like it should by day 5.
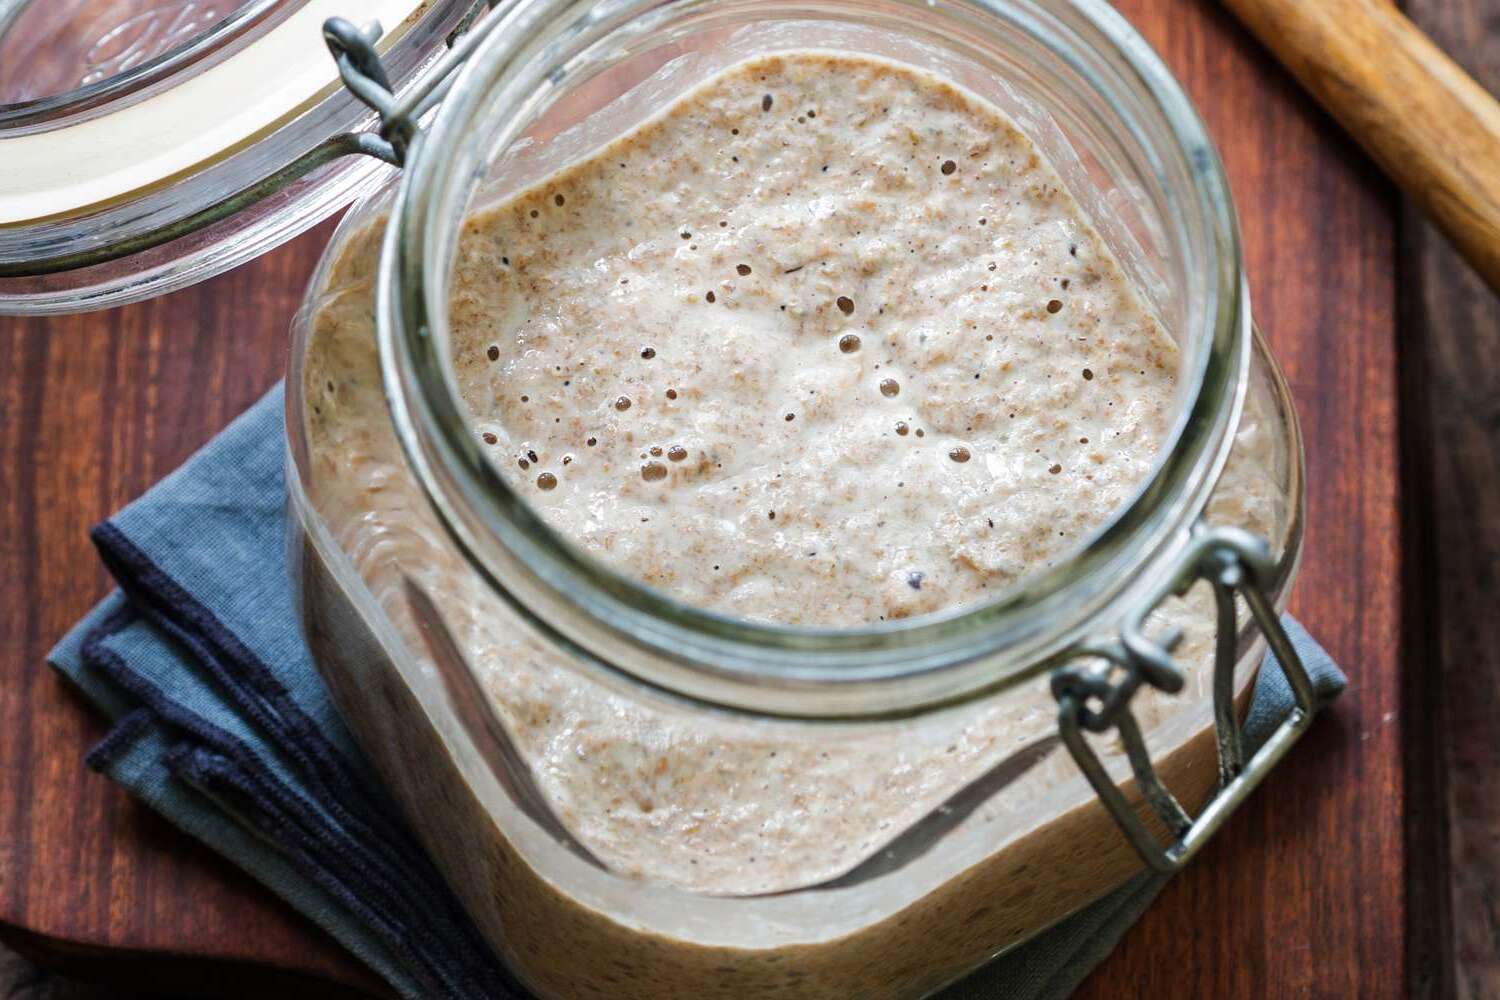
When I first tried this, I didn’t discard enough, and my starter got a bit messy and slow to bubble. After I started discarding half every day, it worked so much better! Also, I like to keep my starter in a clear glass jar so I can watch all the bubbles form—it’s like a little science experiment happening right in my kitchen. Watching it grow makes waiting for day 5 way more fun.
Suggested Side Dishes
Alternative Ingredients
whole wheat flour - Substitute with rye flour: Rye flour contains natural yeast and bacteria that can help in the fermentation process, similar to whole wheat flour.
whole wheat flour - Substitute with spelt flour: Spelt flour has a similar nutritional profile and can also promote the growth of wild yeast for a starter.
filtered water - Substitute with spring water: Spring water is free from chlorine and other chemicals that can inhibit the growth of yeast and bacteria.
filtered water - Substitute with distilled water: Distilled water is pure and free from impurities that might affect the fermentation process.
Alternative Recipes to Try
How to Store or Freeze This Recipe
To keep your starter thriving and ready for action, store it in a glass jar with a loose-fitting lid in the refrigerator. This slows down the fermentation process, allowing you to feed it less frequently.
If you plan to use your starter regularly, feed it once a week. Remove it from the fridge, let it come to room temperature, discard half, and feed it with ½ cup of whole wheat flour and ½ cup of filtered water. Let it sit at room temperature for a few hours before returning it to the fridge.
For long-term storage, consider freezing your starter. First, ensure it's at peak activity by feeding it and letting it sit at room temperature until bubbly. Then, transfer a portion to a freezer-safe container, leaving some room for expansion.
When you're ready to revive your frozen starter, thaw it in the refrigerator overnight. Once thawed, bring it to room temperature and feed it as usual. It might take a few feedings to regain its full vigor.
If you find yourself with an abundance of starter, consider drying it for even longer storage. Spread a thin layer on parchment paper and let it air dry completely. Once dry, break it into pieces and store it in an airtight container. To reactivate, dissolve a piece in water and feed it over several days.
Always keep an eye on your starter for any off smells or colors. A healthy starter should smell pleasantly tangy and have a creamy, bubbly appearance. If anything seems amiss, it's best to start fresh.
How to Reheat Leftovers
Gently warm your starter in a saucepan over low heat. Stir continuously to ensure even heating and prevent any sticking. This method helps maintain the integrity of the starter's flavor and texture.
Use a double boiler to reheat the starter. Fill the bottom pot with water and bring it to a simmer. Place the starter in a heatproof bowl over the simmering water, stirring occasionally until warmed through. This indirect heat method is gentle and preserves the starter's delicate balance.
If you're in a hurry, microwave the starter in short bursts. Place it in a microwave-safe bowl, cover loosely, and heat in 10-second intervals, stirring in between. Be cautious not to overheat, as this can alter the starter's texture.
For a rustic touch, reheat the starter in a preheated oven. Spread it thinly on a baking sheet and warm at a low temperature, around 200°F (93°C), for a few minutes. This method can add a slight crispness to the edges, enhancing the starter's character.
If you have a slow cooker, use it to gently reheat the starter. Set it to the lowest setting, place the starter inside, and cover. Stir occasionally until it reaches the desired temperature. This method is perfect for maintaining the starter's consistency without rushing the process.
Essential Tools for This Recipe
Glass jar: A container to hold the starter mixture, allowing it to ferment and develop over several days.
Cloth: Used to cover the jar, allowing air to circulate while keeping out dust and insects.
Measuring cup: Essential for accurately measuring the flour and water to maintain the correct proportions in the starter.
Spoon or spatula: Useful for stirring the mixture thoroughly to ensure the flour and water are well combined.
Rubber band or string: Can be used to secure the cloth over the jar, ensuring it stays in place during fermentation.
Time-Saving Tips for This Recipe
Use warm water: Using slightly warm filtered water can speed up the fermentation process, helping your starter become active more quickly.
Choose a warm spot: Place your starter in a consistently warm area of your kitchen to encourage faster fermentation.
Pre-measure ingredients: Pre-measure your whole wheat flour and filtered water for daily feedings to streamline the process.
Use a clear jar: A clear glass jar allows you to easily monitor the starter's progress without opening it frequently.
Set reminders: Use phone alarms or calendar alerts to remind you of daily feedings, ensuring consistency.
No Commercial Yeast Starter Recipe
Ingredients
Starter Ingredients
- 1 cup Whole Wheat Flour
- 1 cup Water Filtered
Instructions
- Day 1: Mix 1 cup of whole wheat flour and 1 cup of filtered water in a glass jar. Cover with a cloth and let sit at room temperature.
- Day 2-5: Each day, discard half of the starter and feed it with ½ cup of whole wheat flour and ½ cup of filtered water. Stir well and cover again.
- By day 5, the starter should be bubbly and have a tangy smell. It's ready to use.
Nutritional Value
Keywords
More Amazing Recipes to Try 🙂
- Pig Pickin Cake Recipe40 Minutes
- Clotted Cream Recipe12 Hours 5 Minutes
- Mexican Whole Wheat Flour Tortillas Recipe35 Minutes
- Roasted Cabbage Recipe40 Minutes
- Scrambled Egg Muffins Recipe30 Minutes
- Ground Turkey Taco Meat Recipe30 Minutes
- Watermelon Basil Salad Recipe15 Minutes
- Ciabatta Grinder Salad Sandwich Recipe15 Minutes
Leave a Reply