
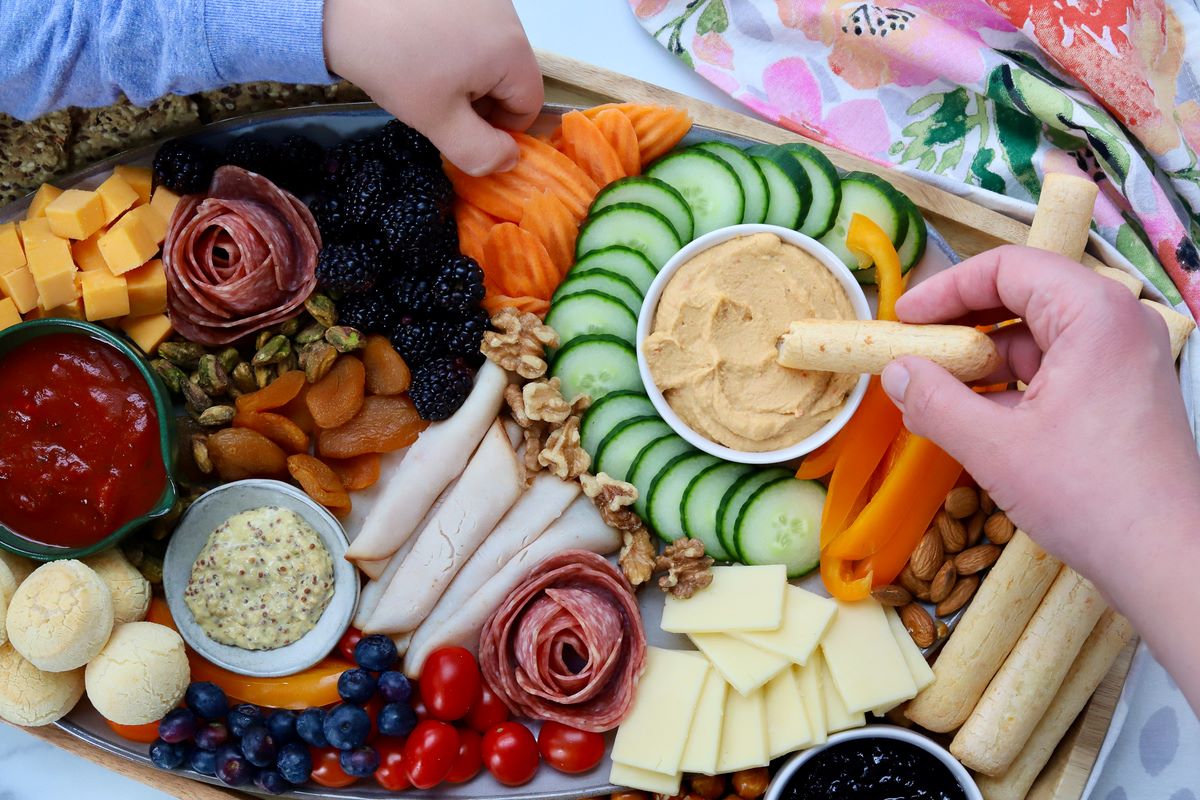
I love putting together a charcuterie board because it feels like creating a little party on a plate. It’s a fun way to share different flavors and textures with friends or family, and everyone can pick what they like. Scroll down to see how simple it is to make your own colorful and tasty board!
Some ingredients like prosciutto or brie might not be in your kitchen already, but you can find them easily at most supermarkets. Look for the deli or cheese section for the cured meats and cheeses. If you don’t usually buy olives or certain nuts, check the snack or international aisles, and you’ll spot plenty of options to choose from.
Ingredients For Charcuterie Board Recipe
Cheddar, brie, gouda assorted cheeses: These cheeses offer a mix of creamy, sharp, and mild flavors that make the board interesting.
Salami, prosciutto assorted cured meats: These add savory and slightly salty tastes that pair well with the cheeses.
Water crackers, whole grain crackers: Crackers give a crunchy base to enjoy with the cheeses and meats.
Grapes, apple slices fresh fruits: Fresh fruits add a juicy sweetness that balances the savory items.
Almonds, walnuts nuts: Nuts bring a nice crunch and a bit of earthiness to the board.
Green, black olives: Olives add a salty, tangy bite that complements the other flavors.
Technique Tip for Your Board
When you’re putting together a charcuterie board, one of the most fun parts is arranging the cheeses and cured meats so they look inviting and tasty. A simple trick to make this easier is to start with the cheeses. Here’s how you can do it step by step:
- Pick your cheeses and cut them into different shapes—like cubes, slices, or wedges. This adds variety and makes the board more interesting.
- Place the biggest pieces first on your platter, spacing them out so there’s room for everything else.
- Leave some space around each cheese so you can add the cured meats and other goodies later.
Doing this first helps you see how much space you have left and keeps the board from looking crowded or messy. It also makes it easier to grab a piece without knocking everything over!
When I first made a charcuterie board, I piled everything on without thinking about the layout, and it ended up looking like a jumbled mess. After I started arranging the cheeses first, everything fell into place much better. Plus, cutting the cheeses into different shapes makes it more fun to eat and share with friends.
Another little tip: use small bowls or ramekins for things like olives and nuts. This keeps them from rolling around and makes your board look neat. Once you’ve got your cheeses and cured meats set, just fill in the gaps with crackers, fresh fruits, and those little bowls of nuts and olives. It’s a simple way to make your board look colorful and inviting without any stress.
Suggested Side Dishes
Alternative Ingredients
cheddar - Substitute with havarti: Havarti has a creamy texture and mild flavor that can complement other cheeses on the board.
brie - Substitute with camembert: Camembert offers a similar creamy texture and rich flavor profile.
gouda - Substitute with edam: Edam has a slightly nutty flavor and firm texture, making it a good alternative.
salami - Substitute with chorizo: Chorizo adds a spicy kick and robust flavor to the board.
prosciutto - Substitute with serrano ham: Serrano ham has a similar delicate texture and salty taste.
water crackers - Substitute with rice crackers: Rice crackers are light and crispy, providing a good base for cheeses and meats.
whole grain crackers - Substitute with multigrain crackers: Multigrain crackers offer a similar hearty texture and flavor.
grapes - Substitute with cherry tomatoes: Cherry tomatoes provide a burst of freshness and a slightly sweet flavor.
apple slices - Substitute with pear slices: Pear slices offer a similar crisp texture and sweet flavor.
almonds - Substitute with cashews: Cashews have a creamy texture and mild flavor that pairs well with other board elements.
walnuts - Substitute with pecans: Pecans offer a similar crunchy texture and slightly sweet flavor.
green olives - Substitute with capers: Capers provide a briny, tangy flavor that can complement the other ingredients.
black olives - Substitute with sun-dried tomatoes: Sun-dried tomatoes add a rich, savory flavor and chewy texture.
Alternative Recipes to Try
How to Store or Freeze Your Board
Store any leftover cheeses in airtight containers or wrap them tightly in plastic wrap. This will help maintain their freshness and prevent them from drying out. Place them in the refrigerator where they can last for up to a week.
For cured meats, wrap each type individually in parchment paper or plastic wrap, then place them in a resealable plastic bag. This will keep them from sticking together and preserve their flavors. Store them in the refrigerator for up to two weeks.
Keep crackers in an airtight container at room temperature. This will prevent them from becoming stale and maintain their crispiness. They can last for several weeks if stored properly.
Fresh fruits like grapes and apple slices should be stored in the refrigerator. Place them in a plastic bag or container to keep them fresh. Apples can be sprinkled with a bit of lemon juice to prevent browning. Consume within a few days for the best taste.
Nuts such as almonds and walnuts should be stored in an airtight container at room temperature. They can also be refrigerated to extend their shelf life. Nuts can last for several months if stored correctly.
Olives should be kept in their original brine in a sealed container in the refrigerator. This will keep them flavorful and fresh. They can last for several weeks when stored properly.
If you need to freeze any components, wrap cheeses and cured meats tightly in plastic wrap and then in aluminum foil to prevent freezer burn. Place them in a freezer-safe bag or container. They can be frozen for up to three months. Thaw in the refrigerator before serving.
Avoid freezing crackers and fresh fruits as they do not retain their texture well after thawing. Instead, purchase these items fresh when you plan to serve the charcuterie board again.
How to Reheat Leftovers
Preheat your oven to 350°F (175°C). Arrange the leftover cheeses and cured meats on a baking sheet lined with parchment paper. Heat for about 5-7 minutes until the cheeses are slightly melted and the meats are warm.
For a quicker option, use a microwave. Place the cheeses and cured meats on a microwave-safe plate. Heat on medium power for 30-second intervals until warmed through, being careful not to overheat and dry out the meats.
If you prefer a stovetop method, use a non-stick skillet over medium heat. Add the cured meats first, cooking for 1-2 minutes on each side until slightly crispy. Then, add the cheeses and heat until they begin to melt.
To reheat crackers, place them in a preheated oven at 300°F (150°C) for about 5 minutes to restore their crispiness.
Fresh fruits like grapes and apple slices are best enjoyed cold. If you prefer them warm, lightly sauté apple slices in a pan with a touch of butter and a sprinkle of cinnamon for a cozy twist.
Nuts and olives can be enjoyed at room temperature. If you wish to warm them, place nuts in a dry skillet over medium heat for 2-3 minutes, stirring frequently. For olives, a quick 10-second microwave zap will suffice.
Essential Tools for a Perfect Board
Serving platter: A large, flat surface to arrange and display all the components of the charcuterie board.
Cheese knives: Specialized knives for cutting and serving different types of cheeses.
Small bowls: Used for holding nuts and olives to keep them contained and organized.
Tongs: Handy for placing and adjusting cured meats and other small items on the board.
Cutting board: A surface for slicing fruits, cheeses, and meats before arranging them on the serving platter.
Paring knife: A small knife ideal for slicing fruits and small pieces of cheese.
Cheese markers: Small labels or markers to identify the different types of cheeses on the board.
Serving spoons: Useful for scooping nuts, olives, or spreads onto individual plates.
Toothpicks: Handy for picking up small items like olives or pieces of fruit.
Napkins: Essential for keeping hands clean while enjoying the charcuterie board.
How to Save Time on Preparation
Pre-cut ingredients: Buy pre-sliced cheeses and cured meats to save time on preparation.
Use store-bought items: Opt for ready-to-eat crackers, nuts, and olives to minimize prep work.
Wash fruits in advance: Clean and dry grapes and apple slices ahead of time to streamline assembly.
Group similar items: Arrange cheeses and meats together to make the layout process quicker.
Use a template: Follow a pre-designed charcuterie board layout to speed up the arrangement.
Charcuterie Board Recipe
Ingredients
Main Ingredients
- 200 g Assorted cheeses e.g., cheddar, brie, gouda
- 200 g Assorted cured meats e.g., salami, prosciutto
- 100 g Crackers e.g., water crackers, whole grain
- 100 g Fresh fruits e.g., grapes, apple slices
- 50 g Nuts e.g., almonds, walnuts
- 50 g Olives e.g., green, black
Instructions
- 1. Arrange the cheeses on the serving platter.
- 2. Add the cured meats around the cheeses.
- 3. Place the crackers in a separate section.
- 4. Add the fresh fruits, nuts, and olives in the remaining spaces.
- 5. Serve with cheese knives and enjoy!
Nutritional Value
Keywords
Suggested Main Courses and Desserts
More Amazing Recipes to Try 🙂
- Egg in a Hole Recipe10 Minutes
- Strawberry Chicken Salad Recipe25 Minutes
- Turkey Brine Recipe15 Minutes
- Vegan Breaded Tofu Recipe35 Minutes
- Air Fryer Vegan Buffalo Cauliflower Recipe30 Minutes
- Lemon Posset Recipe15 Minutes
- Banana Coconut Loaf Recipe1 Hours 15 Minutes
- Pear Bread Recipe1 Hours 15 Minutes
Leave a Reply